Application Lifecycle Management for the Power Platform using Azure DevOps
- Jon Russell

- Jun 26, 2024
- 12 min read
Hi all,
I wanted to revisit and refresh this post, as it has been quite a while since I wrote this. I spoke to my good friend and master of all things ALM - Parvez Ghumra. Parvez is a great guy, and I really appreciate his thoughts on this.
Hey!
How are you all recovered from the UK heat this week? Crikey, that was a hot one! In this blog post I will be talking about how you can use Azure DevOps to build and release Power Platform solutions. Special thanks to Sammy Hassan for showing me the light!

Update 1
I have put all of this into a YouTube video if you would rather check that out instead, it's kind of meant to be there in parallel with this blog post:
Update 2
I have added a further reading section, which may or may not grow over time. The first link is one to a blog post by Benedikt Bergmann on moving environment variables over with Azure DevOps.
Update 3
I have added another Step, Step 10, which talks about moving environment variables between environments using a Replace Token step.
Update 4
I have added a link to a YouTube video by UltraDynamics which gives some really good detail on moving Connection References between environments using ADO.
Contents
Introduction
Prerequisites
Step 1: Create an app registration in your Azure AD environment
Step 2: Give Power App Management Permission to your App
Step 3: Install Azure DevOps extensions
Step 4: Create a pipeline to import solution
Step 5: Create an App registration for the target environment
Step 6: Create app users in your Dataverse environments
Step 7: Run the Pipeline to create the build artifact
Step 8: Create a release
Tips and tricks
Introduction
Application Lifecycle Management or ALM is a practice that has been around for a long time, it is an integrated system of tools, people and processes that help to streamline the build and release of software components from Development > UAT > Production. It can also be extended to incorporate automated testing, providing results back to the development team for further continuous improvement and then to repeat the process again.
A solid Power Platform environment strategy will include a minimum of a development, UAT and production environment, as well as a potential staging environment that is a copy of UAT for any additional testing by other teams that might be required.
Prerequisites
The following are required:
A licensed Azure user with permission to create and view Azure AD groups, create app registrations, and grant admin consent to app registrations in Azure AD.
A licensed Azure DevOps user with permissions to create and manage pipelines, service connections (requires Creator rights or above), repos, and extensions.
A licensed Microsoft Power Platform user with permission to create application users and grant administrative permissions to the application user.
Step 1: Create an app registration in your Azure AD environment
Sign in to the Azure Portal:

Search for App Registrations:

Click on New Registration:

Give the App a name, leave everything else as default and click Register:

Take a copy of the Application (client) ID and Directory (tenant) ID, save these in a notepad, we will need them later:

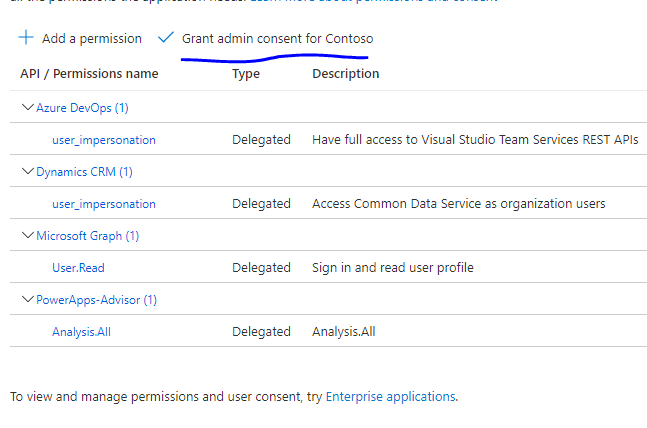
Under the manage section on the left-hand side navigation, click on API permissions:

Click on Add permission, and then choose the Dynamics CRM item on the right -hand side

Choose the user_impersonation permission and click Add permissions:

After adding all of these permissions, click on the Grant admin consent button as shown below:
At this point, you may get an error, I received this:
Could not grant admin consent. Your organization does not have a subscription (or service principal) for the following API(s): Azure DevOps
I solved this problem by signing up for an Azure free subscription and made sure I was the owner of the subscription and then also made sure I had created an Azure DevOps project, by signing up to Azure DevOps here.
Next, we need to new client secret, we can do this by clicking on the Certificates & secrets in the left-hand navigation and then click on "New client secret", as shown below:

Give it a name, leave the expiry as it is and click Add:

We have just created a client secret, IMPORTANT we need to take a copy of the Value and store this in our notepad for later:

Click on Overview in the left-hand navigation and click on Add a Redirect URI:

Step 2: Give Power App Management Permission to your App
So that the Azure pipelines can perform actions in the environment inside your Power Platform tenant, we need to grant Power App Management permissions to the App registration we created above in Azure.
To do this, we need to open Windows PowerShell ISE as an Administrator and run a PowerShell command. Once run, the command gives permissions to the Service Principal to be able to execute environment functions.
To do this you will need the Application (client) ID we created earlier, and also to open Windows PowerShell ISE as an Administrator
Install-Module -Name Microsoft.PowerApps.Administration.PowerShell
Install-Module -Name Microsoft.PowerApps.PowerShell -AllowClobber
New-PowerAppManagementApp -ApplicationId [the Application (client) ID you copied when creating your app registration]
You will be asked to update the NuGet package, click Yes to this. You will also be asked to trust modules to be installed from PSGallery, we can click Yes to All for this.
Step 3: Install Azure DevOps extensions
We now need to install some Azure DevOps extensions. These are third-party extensions that are available in the DevOps market place.
Install the following extensions:
Power Platform Build Tools - https://marketplace.visualstudio.com/items?itemName=microsoft-IsvExpTools.PowerPlatform-BuildTools
Replace tokens - https://marketplace.visualstudio.com/items?itemName=qetza.replacetokens
SARIF SAST Scans Tab - https://marketplace.visualstudio.com/items?itemName=sariftools.scans
For each link click on the green "Get it Free" button, choose your organisation from the drop down and click install.
Step 4: Create a pipeline to import solution
We are now going to jump into Azure DevOps into the Pipelines section. What we are going to do here is create a pipeline, also known as a build, that will export a solution for us and save it in the cloud so that we can then release it to our target environment at a subsequent step.
Go to https://dev.azure.com/ and choose your Project.
Click on Pipelines on the left-hand navigation and click Create Pipeline.
Choose the "Other GIT" option for Where is your code? :

Select Azure Repos Git and choose the branch you created above and click continue

Scroll down to the bottom of the Select a template list and choose Empty Pipeline.
We are taken to the build pipeline page; it is here that we are going to create a build pipeline profile which will use various Power Platform tasks so that we can export our solution and store it in the main branch ready for a release later on.
Click on the plus (+) icon next to the Agent job 1 section:

Search for Power Platform and all the relevant tasks will appear:
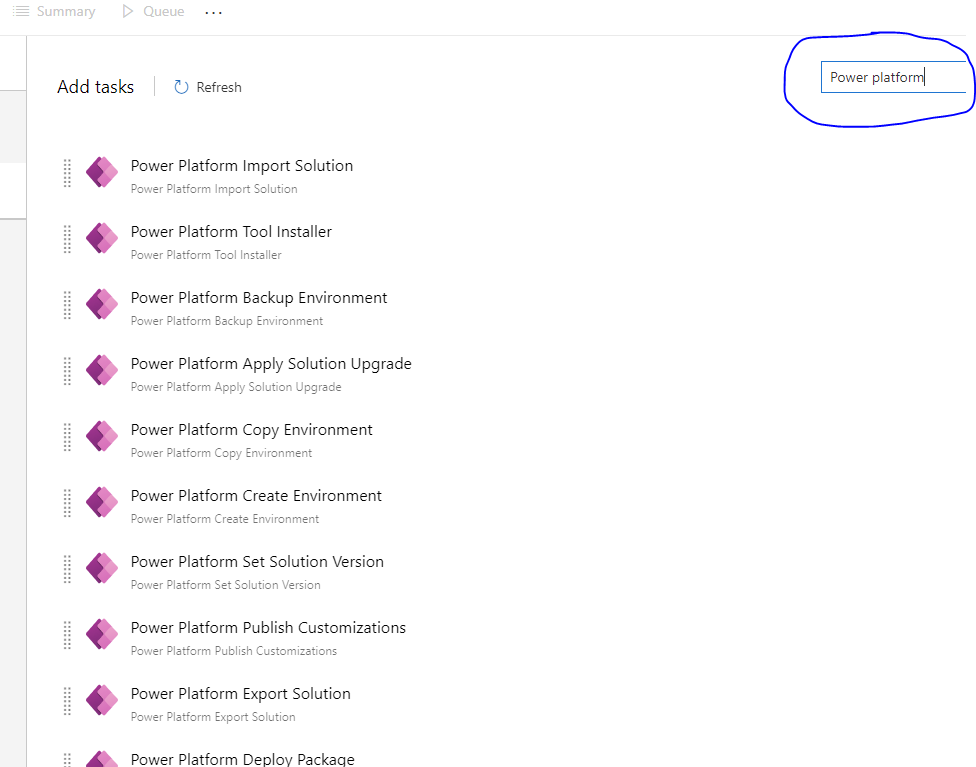
Click on each one of these in order, and click the Add button:
Power Platform Tool Installer
Power Platform Publish Customizations
Power Platform Export Solution (we will rename this to Power Platform Export Managed Solution)
Power Platform Export Solution (we will rename this to Power Platform Export Unmanaged Solution)
Then finally search for Publish Build Artifact and add this as the 7th and final step.
We now have our first Build pipeline.
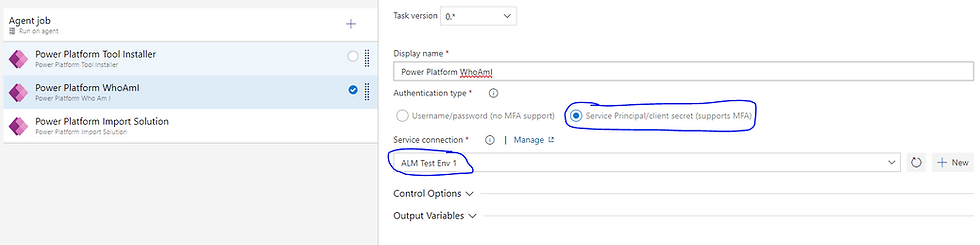
As you can see, some of the steps say they need attention. Let's look at the Power Platform Who Am I step first.
We need to create a service connection to our Dataverse environment to be able to identify who is trying to access our environment. To do this, first click the Service Principal/client secret click on Manage, you will be taken to another page where you can click on Create service connection:

In the New service connection section, choose Power Platform and click Next. This is where your notepad you have stored all the IDs are going to come in handy.
Head over to the Power Platform Admin Centre - https://admin.powerplatform.microsoft.com/ and click on Environments, and choose the environment you are going to be exporting a solution from and copy the environment URL, place this in the Server URL field inside the New Power Platform Service connection section.
For Tenant ID, copy and paste that in and do the same for Application ID and Client secret:

Now go back to the tab where we were creating the Build Pipeline and click on the refresh icon and choose the Service Connection we have just created.

Follow exactly the same as above for the Power Platform Publish Customizations step.
For the Power Platform Export Solution step, first we are going to rename it to Power Platform Export Managed Solution
We then need to head to our Solutions area in the Source environment and take a copy of the Name value:

We can add the name value into the Solution Name field and then for the Solution Output File, use the following $(Build.ArtifactStagingDirectory)\Solution_Name_managed.zip and check the "Export as Managed solution" check box as I have done below:

Repeat the same for the next Power Platform Export Solution step, but remember to change the solution output file to unmanaged and ensure the "Export as Managed Solution" is unchecked:

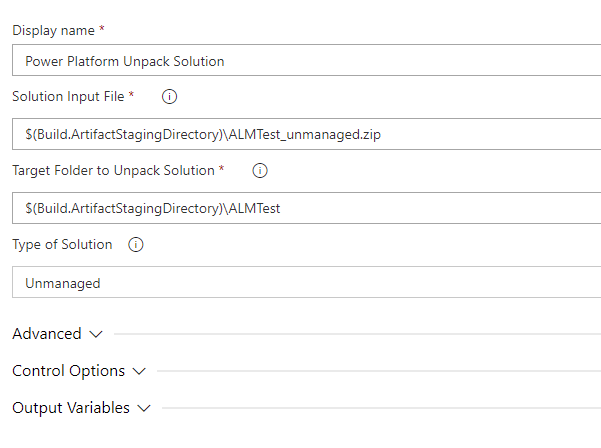
Next go to the Power Platform Unpack Solution step, for the Solution Input file, copy that over from the previous step, and for the Target Folder to Unpack Solution paste in $(Build.ArtifactStagingDirectory)\Solution_Name, as I have done below:
The final "Publish artifacts" step can be left as is.
Click Save under the Save and Queue drop down.
Step 5: Create an App registration for the target environment
Please follow the steps in Step 1, but create this app registration in the target environment.
Step 6: Create app users in your Dataverse environments
For the source and target environment, we need to create an Application User and link this to the App Registration we created.
Source environment:
Head to the Power Platform admin centre and click on the source environment and then click on See all under Users:

Click on the app users list:

Then click on Setup app user, choose the business unit from the drop down and then click on Add an app

Choose the App we created above, and click Add, then click Create

Click on the three dots next to the newly created user and click Edit Security roles, give this user System Administrator.
Target Environment:
Follow the steps above but complete it for the Target Environment, using the app registration you created in Step 6 above.
Step 7: Run the Pipeline to create the build artifact
Head back to DevOps inside the Source environment and go to pipelines, click on the pipeline you create above and click Run pipeline, and click the Run button on the right-hand side popup.
The Agent Job will start running, click on this to see its progress:

The job failed for me at this point, and I could see this error:
##[error]No hosted parallelism has been purchased or granted. To request a free parallelism grant, please fill out the following form https://aka.ms/azpipelines-parallelism-request
I have filled in the form on the URL and have been told that it takes 2-3 days to process.
At this point, I am going to jump in to my other tenant and I will create a new pipeline and run that there.
The Agent Job starts to run and we now have to wait until it is completed:

The build will look like this when complete:

Step 8: Create a release
Back in DevOps, click on Pipelines > Releases, click New and then New Release pipeline, scroll right the way to the bottom of the Select a template list and choose Empty job.
Click on the Add an artifact area, and then choose the Source (build pipeline), in this instance I am choosing ALMTest, and click Add.

Note: Do not copy release pipelines, a new one must be created each time.
Next, click on the Stage 1 section, and click on the 1 job, 0 task link.
Search for Power Platform, and add the steps in the order as shown below:

For the Power Platform WhoAmI step, select the Service Principal radio button and select the service connection for the target environment.
For the Power Platform Import Solution step, choose the same Service Connection, and for the solution import file location, click on the ellipses (3 dots) to the right of the field and browse the branch until you find the managed solution and select it, this will then populate this text field.
Click Save at the top right of the page, then click OK.
Next click on the Create a release button, leave everything as is and click Create.
Release 1 will start:

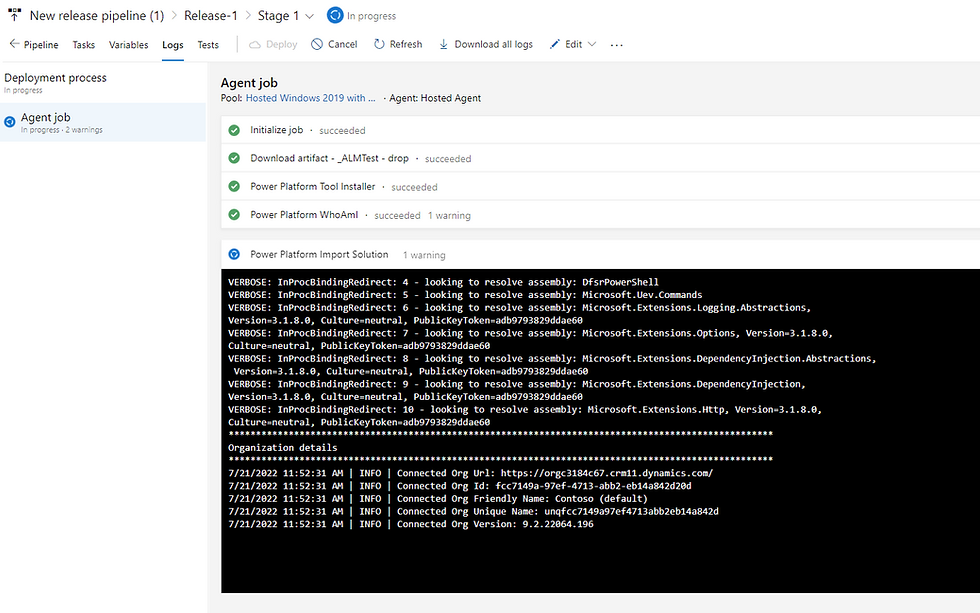
Click on Release-1 to see its progress:

Click on Stage 1, and then click on "Deployment in progress"
Wait for the job to finish then head over to the target environment's solution area and you will see the solution has been installed:

Tips and tricks
Always make sure that the App users you create in the Dataverse source and target environments have the Basic User, Environment Maker and System Customizer security roles, if they don't you will get issues in the Power Platform WhoAmI step.
Always run the build pipeline first before creating a release, that way when you come to looking for the build artifact by clicking on the ellipses as per the screenshot below, you will be able to browse through the repository to find the solution zip file.

If you want to create another release for another build artifact, you must create a new one from scratch, copying an existing build artifact will limit you to being able to browse to that solution branch only.
Further Reading
Power Platform Dev Ops - Connection References:
Step 10: Configuring Variable groups for transfer of environment variables
This bit has been doing my head in to be honest. So, I hope what I explain below can help anyone who is also a little stuck. The pre-req for this is that you need to run through the Set Connection References and Environment variables in the pipelines link above in Further Reading.
Once you have done that and have a deployment-settings.json file, then you can crack on here. From now onwards, I'll refer to that file as the settings file.
First of all, we need to get the settings file into our Repo. To do that click on Repos on the left-hand side in ADO. Expand the Pipelines folder and then create a new folder called Settings.
Create your json settings file in here, by clicking on New > File, call the file "deployment-settings.json" and click Create. Paste the contents of the deployment-settings.json file you created, in here.
In my example, it looks like this
{
"EnvironmentVariables": [
{
"SchemaName": "jdf_TestVariable",
"Value": ""
}
],
"ConnectionReferences": []
}
We could hardcode the target system "Value" in this, but that is not really scalable. What we want to do is create a Variable Group, which contains all of the variables and their environment specific values and then pass these through as part of the release pipeline.
Click commit to save the changes to the settings file, and we will come back to it shortly.
Click on Pipelines > Library, and click + Variable Group to create a new variable group. Call this something distinctive, and include the target environment i.e. UAT, PREPROD, PROD etc.
Click on the Add button, and give your variable a name and a value. If it is a secret, you can click on the padlock to anonymise the data.

Make a note of the variable Names, and for each of these we need to go back and edit the json settings file.
Go back to Repos > Pipelines > Settings, and edit the deployment-settings.json file. In our instance, we are putting in the "Container.Variable" value inside the value of the jdf_TestVariable variable, so our json will look like this below:
{ "EnvironmentVariables": [ { "SchemaName": "jdf_TestVariable", "Value": "__Container.Variable__" } ], "ConnectionReferences": [] }
It is important to add two underscore characters at the start and end of the variable name, this is important in one of the following steps below in regard to pattern matching when the execution of the replace token step happens at runtime.
Head over to Pipelines, choose your pipeline and add a new step called Copy files, the settings and its placement are shown below:

Save the Pipeline.
Head over to the release. click on the tasks/jobs link:

Yours probably says "1 job, 3 tasks". Click "Add a task to agent job" plus sign and search for "Replace tokens". Add this to the Agent Job, drop it in one step above the Publish Artifact drop step:
It should be configured as per below:

Click the three dots on the Root Directory step and point it to the Settings folder, and then put in the name of the settings file in the target files section, in our case deployment-settings.json.
Change the token pattern drop down to __..__, this is important as when we amended the value of the variable inside the settings json file above, the value was preceded by and appended by two underscore characters. This pattern matches the variable name and replaces it with the variable value, once the Variable Group is linked as per the step below.
Next, click on the Variables, then click on Variable Groups, and then click on Link variable group, you'll be able to select the variable group you created above and then link it to the stage you are deploying too i.e. UAT, PREPROD or PROD. This depends on your pipeline setup.

Click Save to save the release and off you go.
One extra tip I have is that when you do the release to the target environment and check the value of the variable, when I did it, I couldn't see the variable value assigned to the variable:

The way to check it has been correctly assigned is to go out of the solution, click on Dataverse > Tables. Click on the All tab and then search for "environment", and then select the Environment Variable Value table (this is where the Environment variables are stored and saved):

Once here, click on the "+xx more" drop down and check the box to show the "Environment Variable Definition" column:

You can then verify that your environment variable has been set to the value you provided in your variable group:

Thanks for reading, this was a bit of a big one! I hope it helps you in your Power Platform journey.
As always, my inbox is open for any questions - jon@jondoesflow.com or alternatively drop a comment on this post.
Thanks.


I have never used Azure DeVops, so I came across your article, I wanted to know how to use it correctly. Thanks to your video, I realized what my mistakes were and corrected them. I think you should devote more time to creating such training videos, because you are doing great! You need to add effects to your video and convert it to another format with this to improve the picture quality.
Thanks for the informative article!